I found a bunch of paper doilies at the thrift store a few months ago and was trying to think of what I would use them for and came up with a rolled paper doily wreath! I’ve been wanting to make a rolled paper wreath for some time now and here was my opportunity.

I think it’s so pretty and lacey looking!

Disclosure: This post may contain affiliate links to Amazon and/or Etsy, which means that I may earn a small commission from some of the links in this post. Please see our Disclosure Page for more information.
As usual I didn’t have a real wreath form but honestly for this type of wreath it doesn’t mater.

I used a dinner plate and cut a circle from a piece of foam core that I had laying around. You could also use cardboard. Anything with a bit of weight to it because when it’s completed it is a little on the heavy side (unless you make a little one and then a cereal box would be fine).
Roll a bunch of doilies into a cone shape. I used a low temp glue gun to seal the cones and even though I thought I had rolled a lot, I had to roll more as I got to the end of making my wreath.

I found the center of my circle and I made another little circle the size of a tea cup saucer around that because you’re going to hot glue the point of your cones to outside edge of the small circle. I’m not giving sizes because it all depends on how big you’re making your own wreath and what size doily you use for your cones – just eyeball it. You can always lay it all out before gluing anything down.

As you can see they don’t line up perfectly (at least mine didn’t). I knew I’d be putting a second layer of cones and that would hide any gaps. The second layer is glued down in that open circle and they’re a little shorter (cut the point of the cones down). I used 42 doilies in total because I had two layers. These were 8 inch doilies.
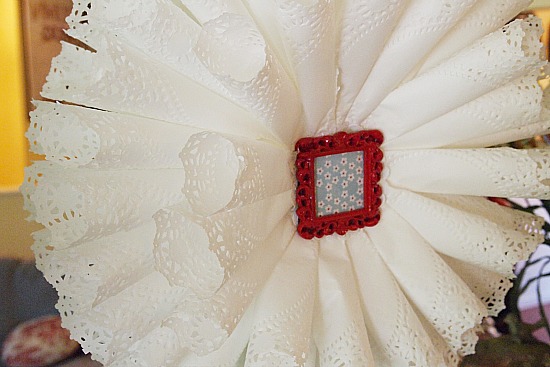
You’ll need to hot glue something to the center to hide where all the cones meet. I used a little frame from Michaels with some scrapbook paper in it. You could make some paper fan flowers or whatever strikes your fancy.

I think this will be a fun summer time wreath! You can do the same thing with any kind of paper you have if you don’t have paper doilies. Magazine pages, book pages, sheet music, scrapbook paper, atlas pages…anything really.
Try it! It’s an inexpensive yet great looking wreath!
![]()
It’s so pretty with those colorful candles underneath!
Brenda
This is a perfect look for spring/summer…I like the idea of using different kinds of papers too – thanks for sharing a great project!
So sweet and spring-like and those candles with the various cheerful colors that you have displayed there are wonderful as well ! I love the whole thing! 🙂
Manuela – How dainty and delicate that wreath looks. So perfect for spring and/or summer. Wouldn’t that be darling in a little girl’s room? Great job!
Judy
That is so pretty and fresh! Love it!
Very pretty, Manuela! Love the lacey look to the doilies!
Fantastic project Manuela! I think it looks like white eyelet, very summery:)
Very pretty – thanks for sharing the tutorial. I have not hung a Spring/Summer wreath yet – need to redo the one used previously or start new.
Have a great week.
I love the frilly feminine look of the doilies. I’ve liked the wreaths of sheet music and old maps, but this is one I’d actually make! You rock!
This is lovely! Quick question, does the paper warps with time? Or does it keeps it’s shape pretty well?
I’ve never had any paper wreath warp? The cones are glued and then they are glued onto the wreath form so I think it’s very stable.
This is such a wonderful idea and a jazz up from the coffee filter wreathes (which I also love.) I like the touch of the little square frame in the middle.
I also like those candles in the picture all covered with spring.
So pretty:) Great idea Manuela! Have a blessed day dear friend, HUGS!
How pretty and definitely perfect for spring. I love the look of lace…. so feminine. Have a wonderful day!
Beautiful! What a wonderful idea.
I’m visiting you today from a Stroll Thru Life. I co-host a Linky Party Tuesday (open thru Sat). I hope you get a chance to stop by my blog, leave a comment and Link Up, too!
~ Megin of VMG206
Join me each Tuesday for Brag About It Link Up Party
I love it, how pretty is this. I love the brooch centerpiece too. Thanks tons for joining Inspire Me. Hugs, Marty
Catching up on blogs while Hubby is away (hehehe, the mouse on the computer willl play). 😉
SO going to make this, love it!
How pretty!! They look totally fun and easy to make too. Thanks for sharing on our Brag About It Tuesday party. Stop by next week and share more great ideas. ~~ Sharon & Densie
Adorable! It had to be pinned. Just had to be.
What a brilliant idea, it is so cute and can be used year round. Thanks for sharing at the Cabin’s BUDGET DECORATING PARTY
This is soooo cute and would be perfect for the party I am throwing for my friend this weekend. Gonna try to make it if I have the time!!! Thank you for this fantastic inspiration 🙂
This so beautiful, I LOVE this!!! It is so delicate looking. I am going to save this for my new home down the road. Thanks. Great job.
Cynthia