I finally did something with the unfinished chipboard letters I got from Hobby Lobby a long time ago. I made them look like letters sawn from old barnwood! Faux barnwood letters!
Disclosure: This post may contain affiliate links to Amazon and/or Etsy, which means that I may earn a small commission from some of the links in this post. Please see our Disclosure Page for more information.
The regular price of this size letter is $1.99 and I got them at 40% off. If you wait eventually everything in that store goes on sale. I haven’t tried tracking their sales cycle but I’m sure their sales are on some kind of rotating schedule. So unless it’s something you’ve gotta have now – wait! Why spend more when you don’t need to.

At first I thought I’d just paint them with some aqua spray paint. Very easy and they look quite pretty. So you could stop there.

Then one day I went Hobby Lobby to look at fabric and wandered into the scrapbook aisle and saw these wonderful chippy faux barnwood scrapbook papers. Aren’t they fabulous!
They also have other images like pebbles, straw, bricks, rocks – very cool and different from the usual scrapbook paper patterns. Again, they were 40% off but even if they weren’t, the regular price is only 49 cents each.
How to Decoupage Letters
To cover the chipboard letters with the scrapbook paper – I layed the letters on the paper and traced around each letter and then cut them out. I wasn’t too particular about the cutting since I planned on using some sandpaper at the end to distress the letters.
*** TIP: I would recommend painting the edges of your chipboard first because otherwise you’ll see the unfinished board unless you wrap the paper around the edges (and to me that’s just a hassle). I had already painted mine aqua.****

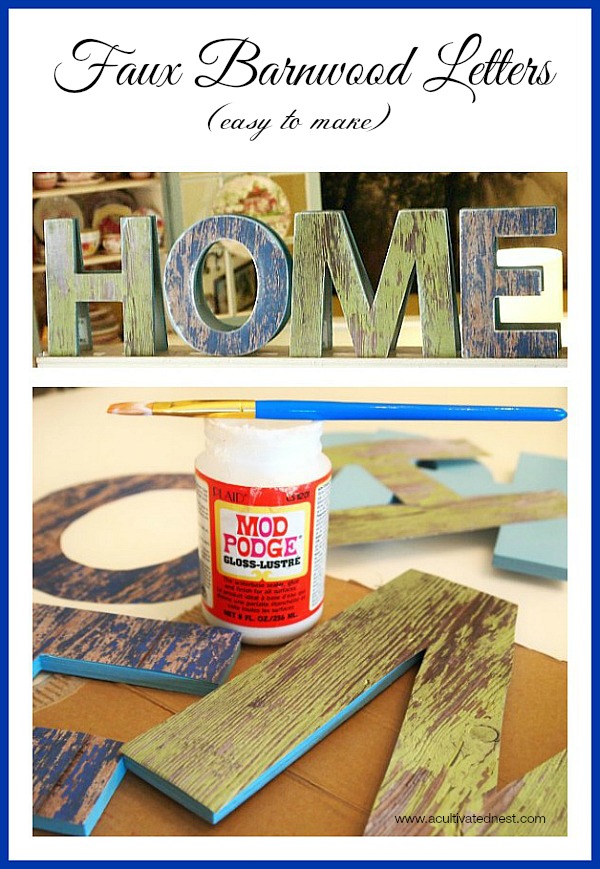
Then I used some Mod Podge and lightly covered a letter and pressed the scrapbook paper I had cut out on top. You could also use spray adhesive. I smoothed out any bubbles and wrinkles. Then I did each of the other letters the same way.

I then sanded the edges of each chipboard letter. That takes care of any extra paper and gives them a nice clean edge.

Covering chipboard with paper or fabric is a really easy and inexpensive way to decorate them and make them reflect your style.

I think they look pretty cool!

Crafting with alphabet letters is an easy inexpensive project that gives you a lot of bang for you buck!
![]()
Love that paper. They relly look like wood. Very cute.
Wow these are AWESOME! They look so real – great job!
Seriously love that paper! I kept looking at it to convince myself you were telling the truth and it was paper. Great job on that project. Like it a lot.
Super cool, Manuela! You come up with the best ideas!
Brenda
I love using letters in my vignettes. Your H O M E turned out great.
Whoa! Scrapbook paper? I thought you’d painted, antiqued, waxed, aged, sanded… the works of “mistreatment” from A to Z. This project turned out fabulously. Thank you for your ever-constant inspiration, Manuela!
Kewl! What a great idea–love how they turned out.
Fantastic! I am so going to do this!
Very pretty, Manuela! I am always drawn in by the different papers in the scrapbook paper aisle {plus the surrounding aisles with the dfferent embellishments}.
How creative! I love them on your mantle, they look fabulous!
Great idea! I will have to check out the scrapbook paper isle next visit to HL. Your letters turned out great!
Awesome tip! I am going to make something using your technique! Have a blessed day dear friend, HUGS!
Great idea! And so true about Hobby Lobby — I feel like such a chump if I pay full price for anything there.
That is SO clever and so cute! Love it.
they came out great! they really look like wood. one of the most clever redo’s of these letters I’ve ever seen.
Wow, I can’t believe how real that paper looks! These are awesome:>)
Those letters look wonderful, I’ve never seen paper like that before.
Hugs, Cindy
They look amazing! I first thought you had painted old barn board and let it weather in the rain! I can’t believe how real it looks.!
Hey Manuela! I LOVE those! You can’t tell they’re not chippy barn wood pieces! Now I want to go back to Hob Lob (was just there last night!) and get some of those letters! 🙂
Wow, those look great! Thanks so much for sharing this idea. I am going to try it!
Nancy
Those are fantastic! I love it!
Thanks for sharing another fabulous and easy project!
Genius! They really do look like wood. And 40% off .49 cents might as well be free. Amazing! Have a great week. Tammy
This tutorial came right at the perfect time. A neighbor of mine is expecting her first baby and it will be a boy. I was actually thinking of doing some letters for the babies room for her to hang on the wall
Hi Manuella,
Your letters look fantastic. Good work. Thanks for showing how it’s done.
Have a good day
Barb from Australia
Wow, these barn-board letters look great! You have the best ideas! Your mantle will look wonderful! Thank you so much for this inspiration. I love that store too!
I love the letter they are nice and rustic. They will look fabulous. I also like the colors you chose.
Cynthia
Fooled me! Your letters really looked like aged barn wood….very realistic!
I am pinning like a gold medal wrestler! I love this idea, and I agree about waiting for stuff to go on sale at HL. It always does, especially stuff like letters and paper.
Oh Manuela, those turned out so good. Wow…you have me thinking. Would’nt this be a good idea for fall, or farmhouse themed sign. I want a welcome sign outside and this would be a great idea to do something like that. Love it. You make it look so easy! It really looks aged!
Have a great week my friend. You are having a creative outburst I’d say! hahaha…
Blessings,
Debbie
This Looks Amazing, I would love for you to share it at our link party
http://live-love-laugh-interiordesign.blogspot.com.au/
Wow – that’s paper? That looks so cool! Pinning this one!
I agree with what everyone else is saying, these turned out wonderfully! I could not tell it was paper. It looked so real!! Great project Manuela!
Blessings,
Marcia
I love the idea! Now you gave me an idea what to put in my kids room.
Thanks for the share.
I love the look of your letters! And I love the location you have placed them. I used Christmas papers a couple of years ago to do a couple of letters for the holidays and they just didn’t turn out right. Never thought of painting the letters first and then sanding the edges. That would have made a ton of difference!
These are great!
at first glance …I thought you made these with real barn wood!
Pat
Manuela, this is seriously one of the most fun projects I have seen in ages! I have to try it…thanks so much for sharing!
These are great! I’ve done the same thing with scrapbook paper and chipboard letters before, but I still couldn’t tell that’s what you’d done till you said it. They look real!
These are fantastic!!!! I had to keep looking at them because I had to convince myself they weren’t really old painted wood. I have to do this project!
(Found you at Jennifer Rizzo, btw.)
Thanks for sharing!
Brenda
These are great, Manuela, so realistic!