• Home
  • About Me
  • Contact Me
  • Privacy Policy, Cookie Policy, & Disclosures
  • Terms
  • Our Books
  • Shop
    • Shop
    • Cart
    • Help

A Cultivated Nest

Helping You Manage Your Home and Life on a Budget

  • Frugal Living
    • All Frugal Living
    • Frugal Kids Activities
    • Budgeting Printables
  • Cleaning + Organizing
    • All Cleaning + Organization
    • Organizing Tips
    • Cleaning Tips
    • DIY Cleaning Products
  • Freebies
    • Resource Library
    • All Free Printables
    • Budget Printables
    • Home Decor Printables
    • Home Management Printables
  • Budget Decorating
  • Recipes
    • All Recipes
    • Breakfast Recipes
    • Snack Recipes
    • Appetizer Recipes
    • Drink Recipes
    • Dinner Recipes
    • Dessert Recipes
  • DIY + Crafts
    • All DIYs
    • Kids Crafts
    • DIY Beauty Products
  • Gardening

DIY Fabric Wrapped Spring Wreath

By Manuela Williams

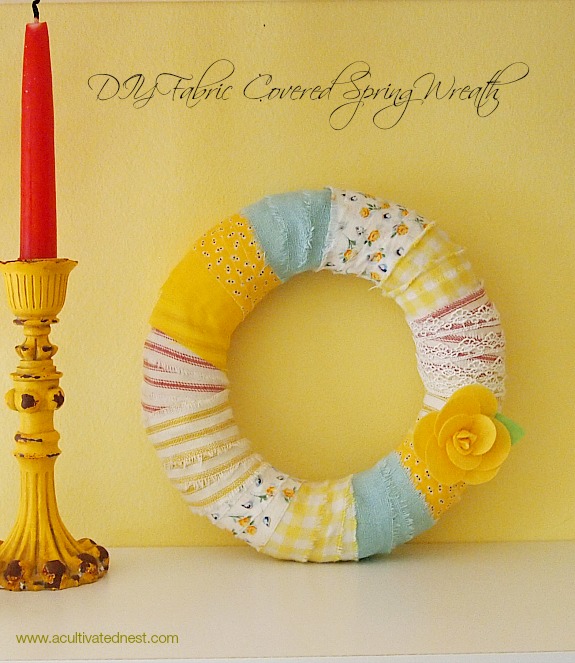
This easy project is a great way to use up scraps of fabric! I made this fabric wrapped wreath for a spring display that I’m working on in my dining room.

DIY fabric covered spring wreath

Disclosure: This post may contain affiliate links to Amazon and/or Etsy, which means that I may earn a small commission from some of the links in this post. Please see our Disclosure Page for more information.

This is so easy and cute!

Materials:

  • straw or styrofoam wreath form
  • 1 inch wide strips of fabric
  • push pins
  • other embellishments you might want to add like lace, rick rack, flowers, brooches etc

materials needed to make a fabric covered wreath

I used a small  straw wreath – 8 inches I believe. The 10 inch straw wreaths are $2.99 and I think the one I used was $1.99?(can’t remember).  You can find them in any craft store as well as thrift stores.

I made 1 inch wide strips of fabric since my wreath was small. I would use 2 inch wide strips for a larger wreath. The strips varied in length but most were at least 15 inches long.  You want to wrap your strips around at least 3 times.

pin fabric to wreath

Wrap your strip of fabric around the wreath and pin it at the back. Continue until the entire wreath is covered with our fabric strips and then add any other embellishments if you wish.

That’s it!

easy to make wreath using fabric scraps

Actually I think it would be just as cute for summer too!


  • Facebook
  • Twitter

Filed Under: DIY Projects, Easy Crafts, Seasonal Decorating Tagged With: DIY projects, Easy Crafts, Fabric Covered Wreath, spring decorating, Wreaths

« How To Better Organize Your Clothes
DIY Moss Projects for Spring »

Comments

  1. Kathy @ Creative Home Expressions says

    March 31, 2014 at 8:03 am

    Very cute, Manuela! I like the idea of using up strips of leftover fabrics for this. Plus, the pinning of the fabric to the wreath. It will make it easy to take apart if you want to do something different.

  2. Theresa H. Roach says

    March 31, 2014 at 8:11 am

    Precious!!! Enjoy this beautiful Spring day:) HUGS

  3. Debra @ Frugal Little Bungalow says

    March 31, 2014 at 8:12 am

    It’s beautiful, bright and cheery! 🙂

  4. Penny @ The Comforts of Home says

    March 31, 2014 at 8:52 am

    I love your wreath! How adorable.

  5. Vee says

    March 31, 2014 at 10:58 am

    Any season depending on the fabrics! Super cool idea and a very charming result!

    • Manuela says

      April 1, 2014 at 12:38 pm

      Thank you so much Vee!

  6. Yvonne @ StoneGable says

    March 31, 2014 at 11:10 am

    ADORABLE! You picked out such great fabric! I’ll have to give this a try.

    • Manuela says

      April 1, 2014 at 12:37 pm

      Thank you Yvonne! I just rummaged around in my fabric bin (I don’t really sew much so I don’t have a ton of fabric) and I did use a tea towel that I no longer use.

  7. Judy Clark says

    March 31, 2014 at 3:30 pm

    How cute and Springy!!!! Darling. Love all of the pastel fabrics.

    Judy

    • Manuela says

      April 1, 2014 at 12:36 pm

      Thank you Judy! I turned the red and white striped fabric over so it would look more faded and blend in with the lighter colors.

  8. Leann says

    March 31, 2014 at 3:50 pm

    Love this and then the wreath is ready to re-use again and again for other seasons!!!

    Leann

    The patchwork reminds me of some scrapbook paper that I have!

    • Manuela says

      April 1, 2014 at 12:35 pm

      Yes! I like re-using wreath forms. I’m not really one to keep the same one forever so this one is great because all you have to do is remove the pins and unwind the fabric strips (which you could reuse as well).

  9. Susan says

    March 31, 2014 at 4:25 pm

    Your wreath is adorable! I love the colors and patterns you chose. Perfect for spring and yes for summer too.

    Big Texas Hugs,
    Susan and Bentley

    • Manuela says

      April 1, 2014 at 12:34 pm

      Hi Susan! Thank you – glad you like it! Sometimes when I make a wreath I like it when I make it and then a week later I’m saying to myself what was I thinking 🙂 But so far I’m still really loving this one.

  10. Betty says

    March 31, 2014 at 5:29 pm

    That is so cute and easy. I have to find me a wreath to make.

    • Manuela says

      April 1, 2014 at 12:31 pm

      Yes it was super easy Betty (especially since you just pin it).

  11. Cindy says

    March 31, 2014 at 8:41 pm

    Really cute, Manuela! I need to find some fabric scraps at a yard sale of something since I don’t sew anymore. Blessings, Cindy

    • Manuela says

      April 1, 2014 at 12:31 pm

      I don’t really sew much either so it was a good way to use up some fabric. I did also use an old tea towel. So maybe look around at what sheets, clothes etc you’re not using anymore and repurpose those into fabric scraps.

  12. Ginnie says

    April 1, 2014 at 12:43 am

    This is so cute! Perfect for spring:)

    • Manuela says

      April 1, 2014 at 12:29 pm

      Hi Ginnie – Thanks so much! I don’t do too much sewing so it was a fun way to use up some material I had.

  13. Cynthia says

    April 1, 2014 at 11:52 am

    This wreath is so cute and I love the fabrics you chose!!

    Cynthia

    • Manuela says

      April 1, 2014 at 12:28 pm

      Thanks Cynthia! The fun part was choosing which fabric scraps to use!

  14. Kathleen Grace says

    April 2, 2014 at 6:10 pm

    Just the kind of project I love..cute and easy!

  15. Felissa (Two Little Cavaliers) says

    April 6, 2014 at 12:40 am

    This is gorgeous Manuela. I dropped by via Show & Tell Friday.

  16. Mindie Hilton says

    April 6, 2014 at 11:05 am

    So cute! Looks easy to do. If you have not shared yet at the Bacon Time linky, please do. Happy Spring to you 🙂

  17. Katie Adams says

    April 13, 2014 at 11:39 pm

    Beautiful wreath, and simple to boot! Thanks for sharing.

Visit the A Cultivated Nest Shop

Check Out Our Books!

Welcome to A Cultivated Nest

Visit the Free Resource Library

Stay Up to Date!

Sign up for our newsletter to stay up to date on all our new posts, plus our shop announcements. As a subscriber benefit you'll get access to our resource library!

Subscribe

Connect With Me On

Pinterest Twitter Mail

Looking For Something?

Disclaimer + Disclosure

A Cultivated Nest makes no claims of “expert status” and the owner will not be liable for any losses, injuries, or damages from the use of the information found on this website. Posts may contain affiliate links. A Cultivated Nest is a participant in the Amazon Services LLC Associates Program, an affiliate advertising program designed to provide a means for sites to earn advertising fees by advertising and linking to Amazon.com. A Cultivated Nest is also a participant in the Etsy affiliate program via Awin. This means that I may earn a small commission from some of the links in my posts. Please see our Disclosure Page for more information.

Search the Archives

Looking for Something?

Popular Posts

  • 20 Dollar Store Easter DIY Decor Ideas
  • 15 Mind Blowing Command Hook Hacks You Need To Know
  • 20 Frugal Ways to Use Dawn Dish Soap

Copyright © 2023 Nest Media GA LLC | All Rights Reserved