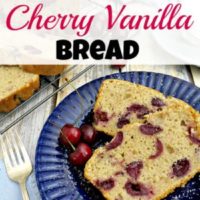
Summer is cherry season! I don’t know about you, but for the past few weeks I’ve been snacking on a lot of delicious fresh cherries! But while I love to eat them as-is, sometimes I like to use cherries in recipes instead, just for a change. If you’re a big fan of cherries like me, then you’ve got to bake up this delicious Cherry Vanilla Bread!

Disclosure: This post may contain affiliate links to Amazon and/or Etsy, which means that I may earn a small commission from some of the links in this post. Please see our Disclosure Page for more information.
Since cherries are in season right now, I used fresh ones in this recipe. However, if you wanted to use frozen ones they would probably be fine. Just make sure to thaw them completely before making the bread. But if you have fresh cherries in your local grocery store, especially organic ones, then use fresh! Fresh is always better!
Cherry Vanilla Bread
Ingredients
2 cups fresh cherries
2 cups all-purpose flour
2 teaspoons baking powder
3/4 cup white sugar
1 teaspoon cinnamon
1/2 teaspoon salt
1/2 cup plain Greek yogurt
1/2 cup vanilla flavored almond milk
2 large eggs
2 teaspoons vanilla extract
1/2 cup coconut oil, melted
powdered sugar (optional)
Instructions
1. Preheat oven to 350 degrees.
2. Spray a 9 x 5 inch loaf pan with non-stick cooking spray and line the middle with parchment paper. I like to leave some sticking out over the top to make lifting the finished bread out of the pan easier.
3. To prep your cherries, wash them, remove the pits, slice the cherries in half, then let them sit in a strainer until ready to use.

 4. In a medium size bowl, add all of the dry ingredients (flour through salt) and whisk to combine. Add the cherries and toss thoroughly to coat.
5. In a separate large bowl, combine all the wet ingredients except the coconut oil and whisk until smooth.
 6. Stream the melted coconut oil into the wet ingredients, whisking constantly. You can also use a hand mixer if that’s easier.
7. Add the dry ingredients to the wet and mix until just combined. Be careful not to overmix or your bread will be tough.
 8. Pour the batter into your loaf pan and bake for 50 – 55 minutes or until a toothpick inserted in the center comes out clean. Check the bread at 40 minutes and cover lightly with a piece of foil if it’s getting too dark on top.
9. When the cherry vanilla bread is done, remove it from the oven and allow it to cool in the pan for 20 minutes. Then remove it from the pan and allow it to completely cool at room temperature.
 10. Dust with powdered sugar before serving, if desired.
Note: I reduced the amount of sugar in the bread itself, because we like our desserts a little less sweet. If you like yours sweeter, you can use a full cup of sugar in the mix. Keep in mind that powdered sugar is very sweet if you’re serving the bread with it sprinkled on top.
Do you like to bake with cherries?

Cherry Vanilla Bread
- Category: Dessert
Description
This recipe uses delicious fresh cherries! It makes a great dessert or snack, and is very easy to put together!
Ingredients
- Ingredients
- 2 cups fresh cherries
- 2 cups all-purpose flour
- 2 teaspoons baking powder
- 3/4 cup white sugar
- 1 teaspoon cinnamon
- 1/2 teaspoon salt
- 1/2 cup plain Greek yogurt
- 1/2 cup vanilla flavored almond milk
- 2 large eggs
- 2 teaspoons vanilla extract
- 1/2 cup coconut oil, melted
- powdered sugar (optional)
Instructions
- Preheat oven to 350 degrees.
- Spray a 9 x 5 inch loaf pan with non-stick cooking spray and line the middle with parchment paper. I like to leave some sticking out over the top to make lifting the finished bread out of the pan easier.
- To prep your cherries, wash them, remove the pits, slice the cherries in half, then let them sit in a strainer until ready to use.
- In a medium size bowl, add all of the dry ingredients (flour through salt) and whisk to combine. Add the cherries and toss thoroughly to coat.
- In a separate large bowl, combine all the wet ingredients except the coconut oil and whisk until smooth.
- Stream the melted coconut oil into the wet ingredients, whisking constantly. You can also use a hand mixer if that’s easier.
- Add the dry ingredients to the wet and mix until just combined. Be careful not to overmix or your bread will be tough.
- Pour the batter into your loaf pan and bake for 50 – 55 minutes or until a toothpick inserted in the center comes out clean. Check the bread at 40 minutes and cover lightly with a piece of foil if it’s getting too dark on top.
- When the cherry vanilla bread is done, remove it from the oven and allow it to cool in the pan for 20 minutes. Then remove it from the pan and allow it to completely cool at room temperature.
- Dust with powdered sugar before serving, if desired.
- Note: I reduced the amount of sugar in the bread itself, because we like our desserts a little less sweet. If you like yours sweeter, you can use a full cup of sugar in the mix. Keep in mind that powdered sugar is very sweet if you’re serving the bread with it sprinkled on top.
This post contains affiliate links to Amazon. Please see our Disclosure Page for more information.
You might also be interested in:

Looks delicious!
Manuela, I’m so happy that you joined Thoughts of Home on Thursday! I am ashamed to say that I lost track of you blog and you are like an old friend to me.
So glad to have you! 😉
Oh, double yum! I love cherries. Thanks so much for sharing your recipe with us at Merry Monday.