
Hi everyone! Last year I did a “shiny and glittery” Christmas. This year’s theme is “trees”. So I’ll be working on making all kinds of trees for the next few weeks. Look what you can do with those really inexpensive bags of bottle brush trees!
Disclosure: This post may contain affiliate links to Amazon and/or Etsy, which means that I may earn a small commission from some of the links in this post. Please see our Disclosure Page for more information.
You can bleach them and then dye them any color you want! Here’s Sarah’s tutorial for making Halloween trees at Making Projiks. I think that she’s been doing this as far back as 2006 so I do believe this is her original idea (correct me if I’m wrong).
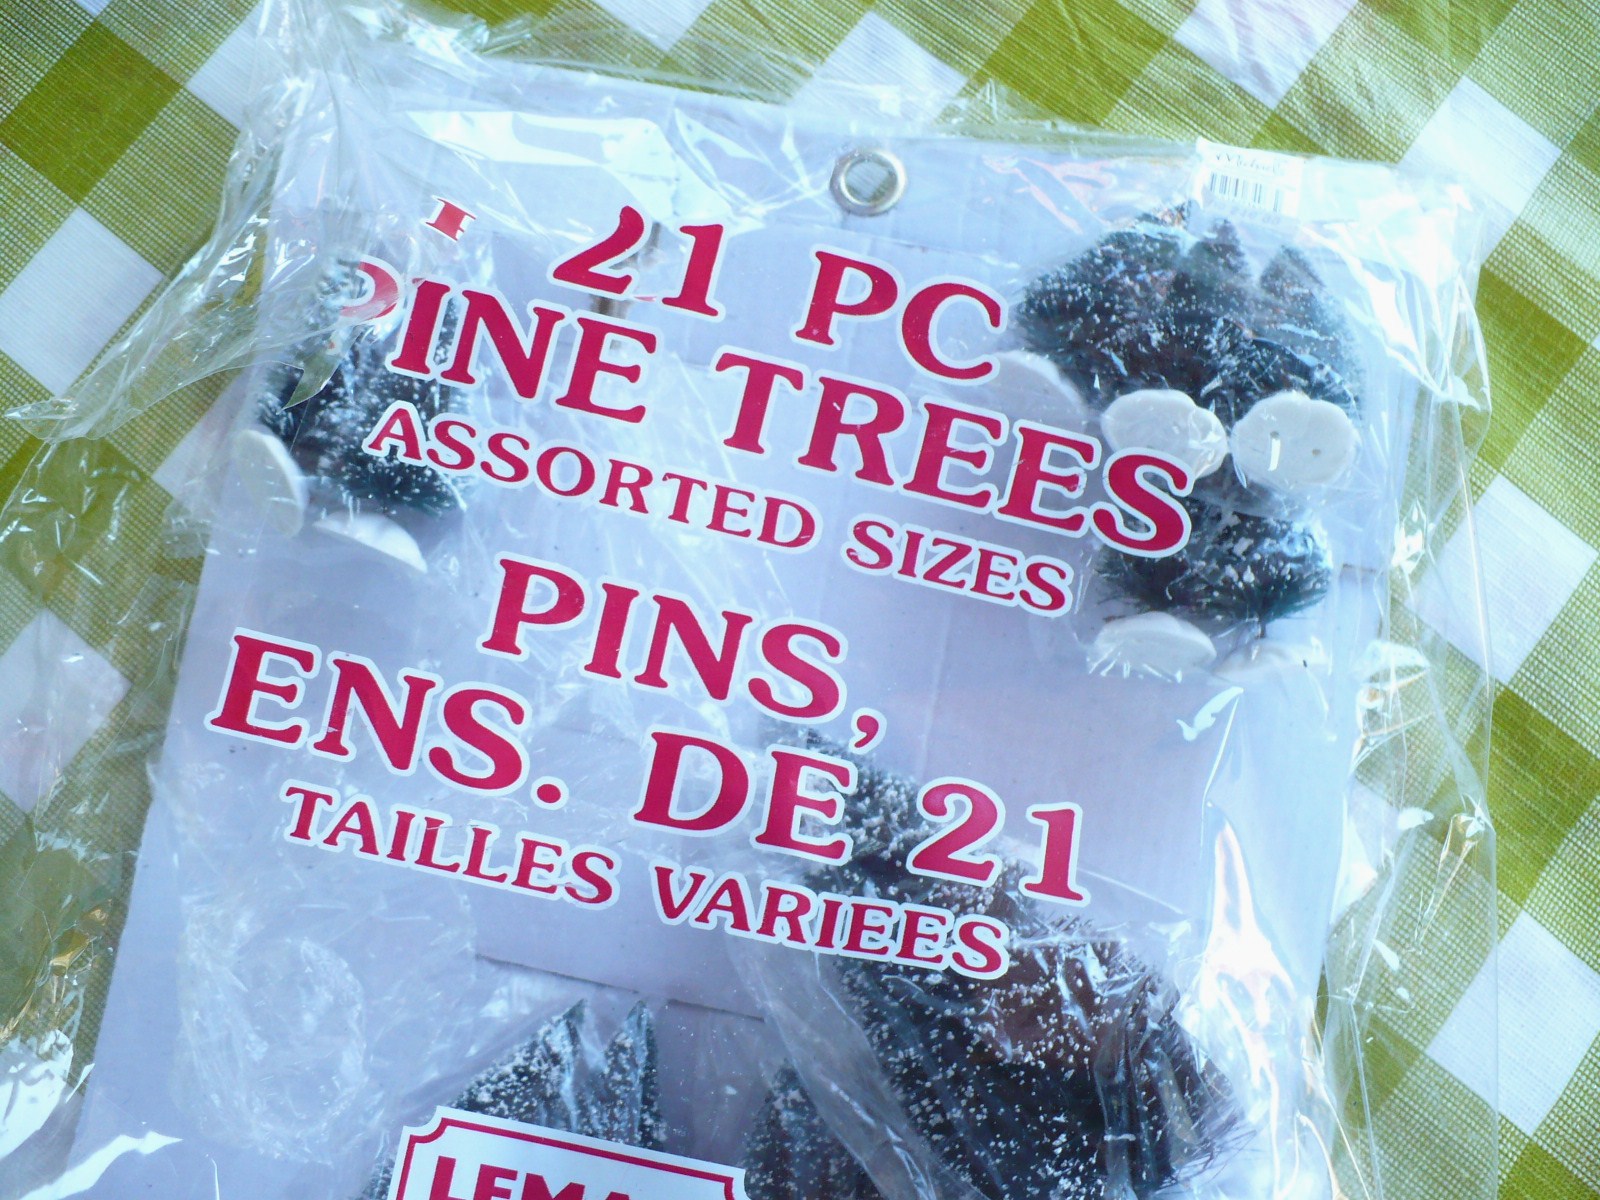
This bag has 21 trees in it in several sizes and most craft stores have them on sale now or you can use your 40% off coupon. Be sure you get this one. I only wanted a few trees last year and I got a smaller bag – they looked the same-after using a gallon of bleach I realized they were plastic not bottle brush! They never bleached!
How to Bleach and Dye Bottle Brush Trees from the Craft Store
Step 1 – I poured about a 1/4 of a bottle of bleach into a deep container and added some hot water and soaked the trees for just a few minutes (swished them around). I didn’t have any trouble bleaching them but if you do try a second soaking. Be sure you wear gloves!!

Step 2. I rinsed the trees and let them dry over night.

You can leave them this color and pretty them up anyway you like with some glitter and other embellishments.
Or…you can dye your bottle brush tree!

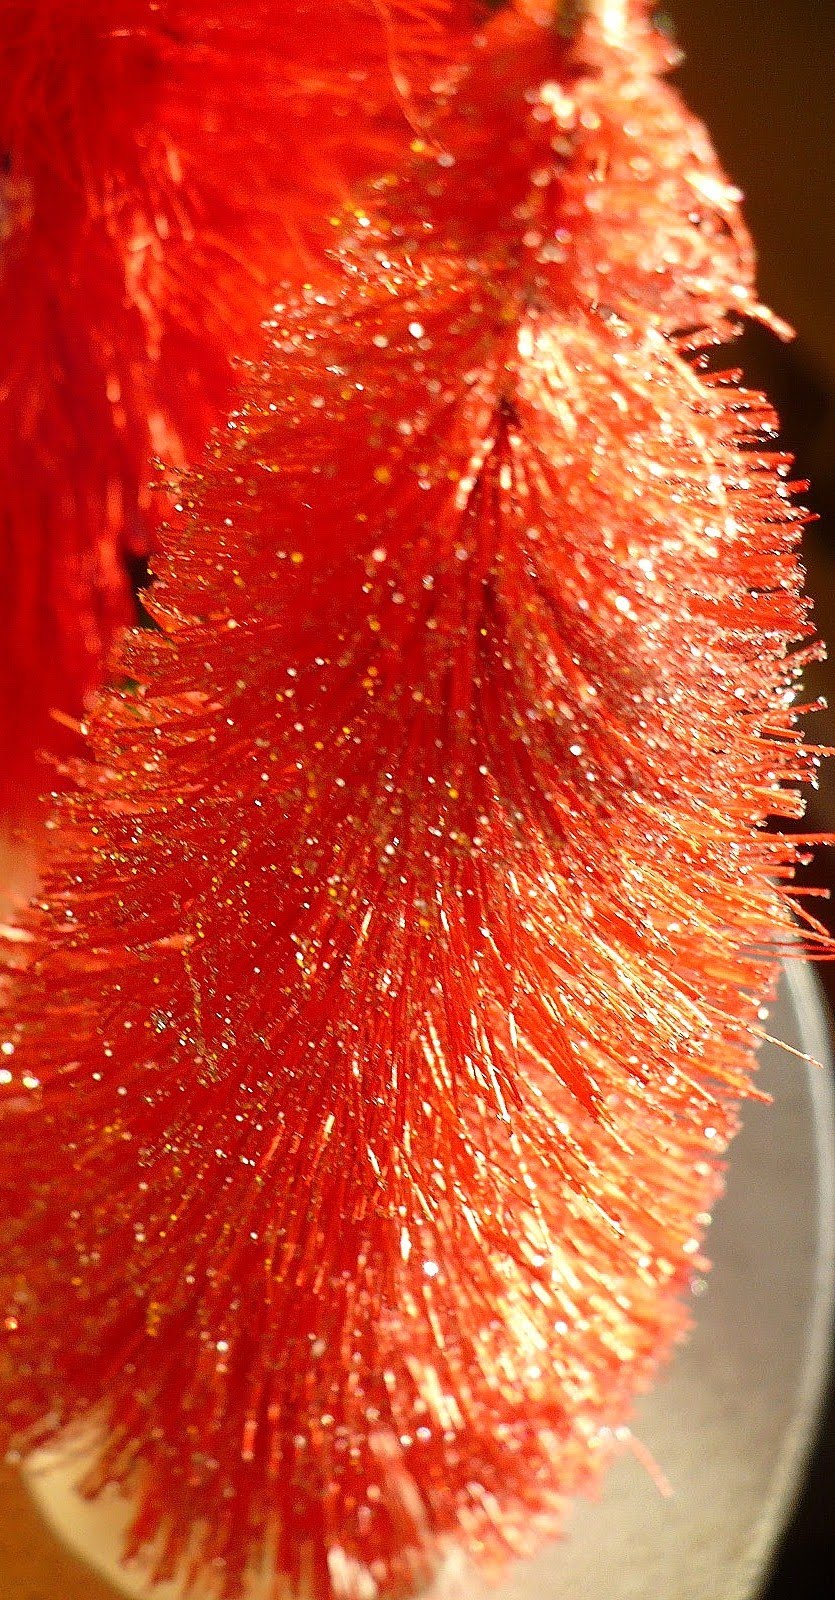
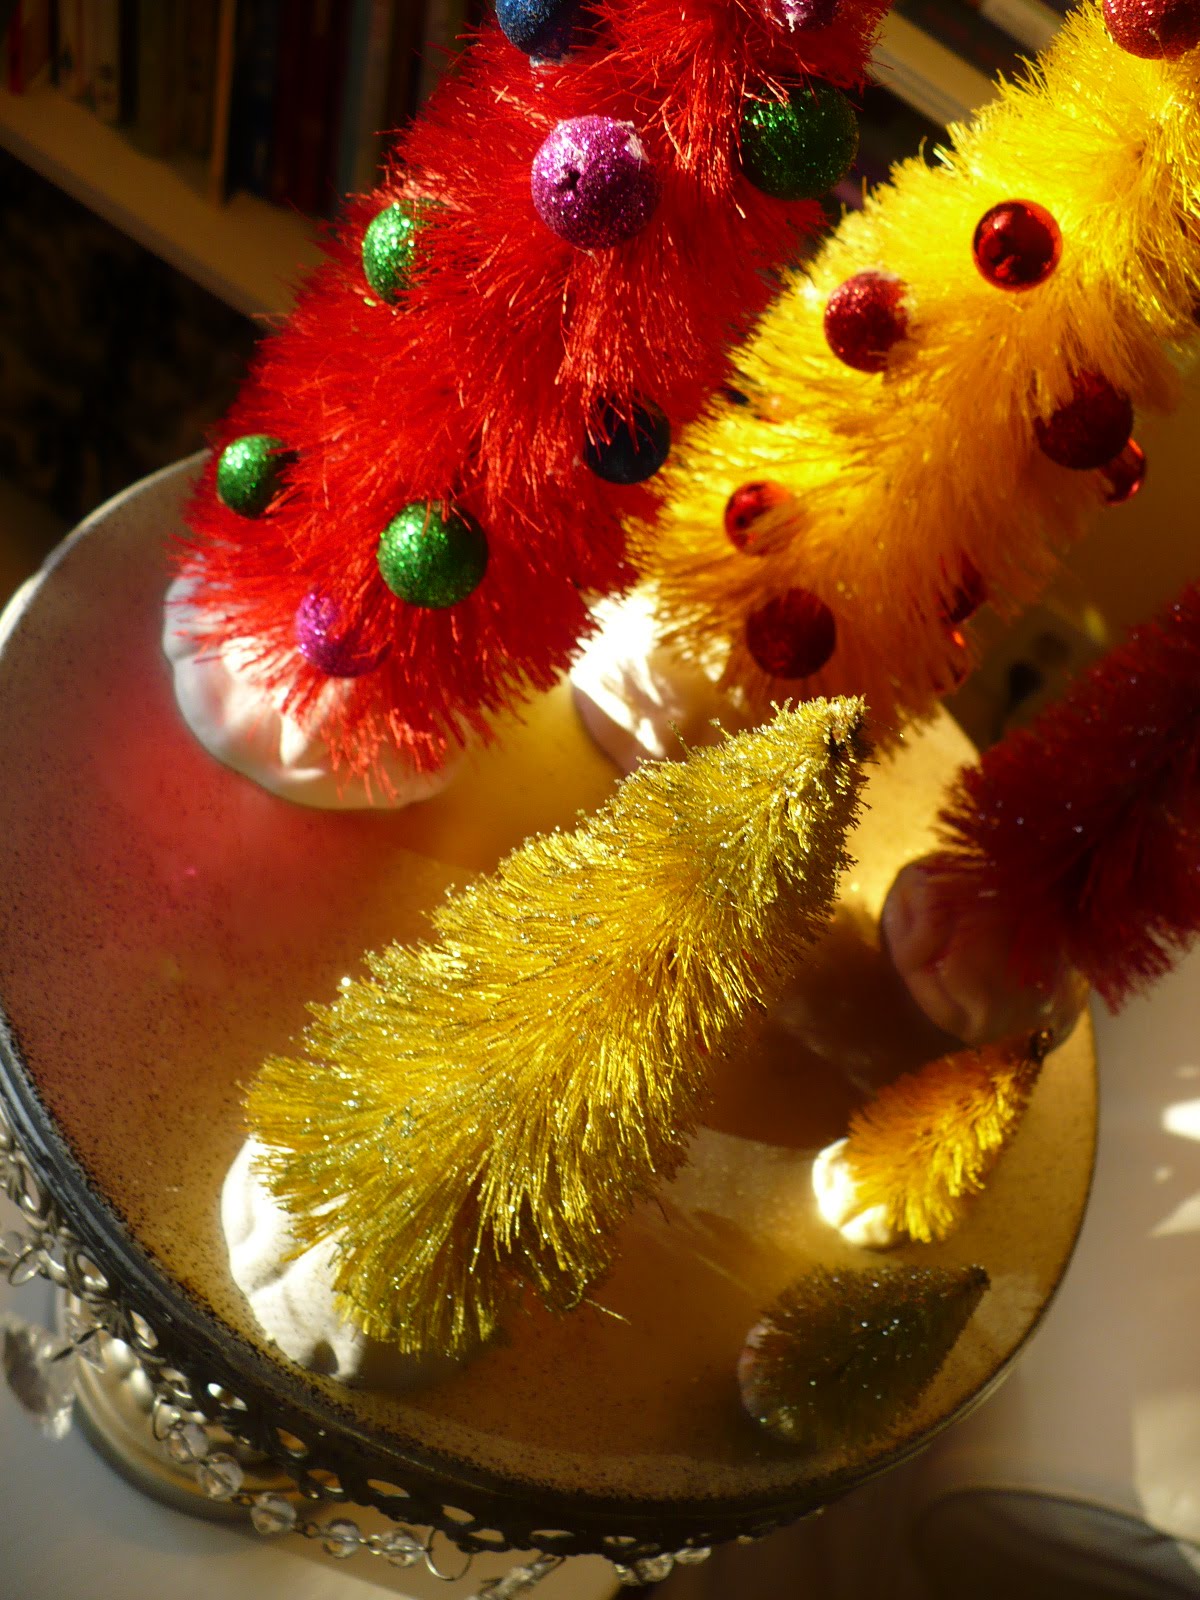
Here’s one in some red Rit dye. I used the liquid dye. I just poured some in the glass bowl and added some hot water. It absorbed the dye really quickly!

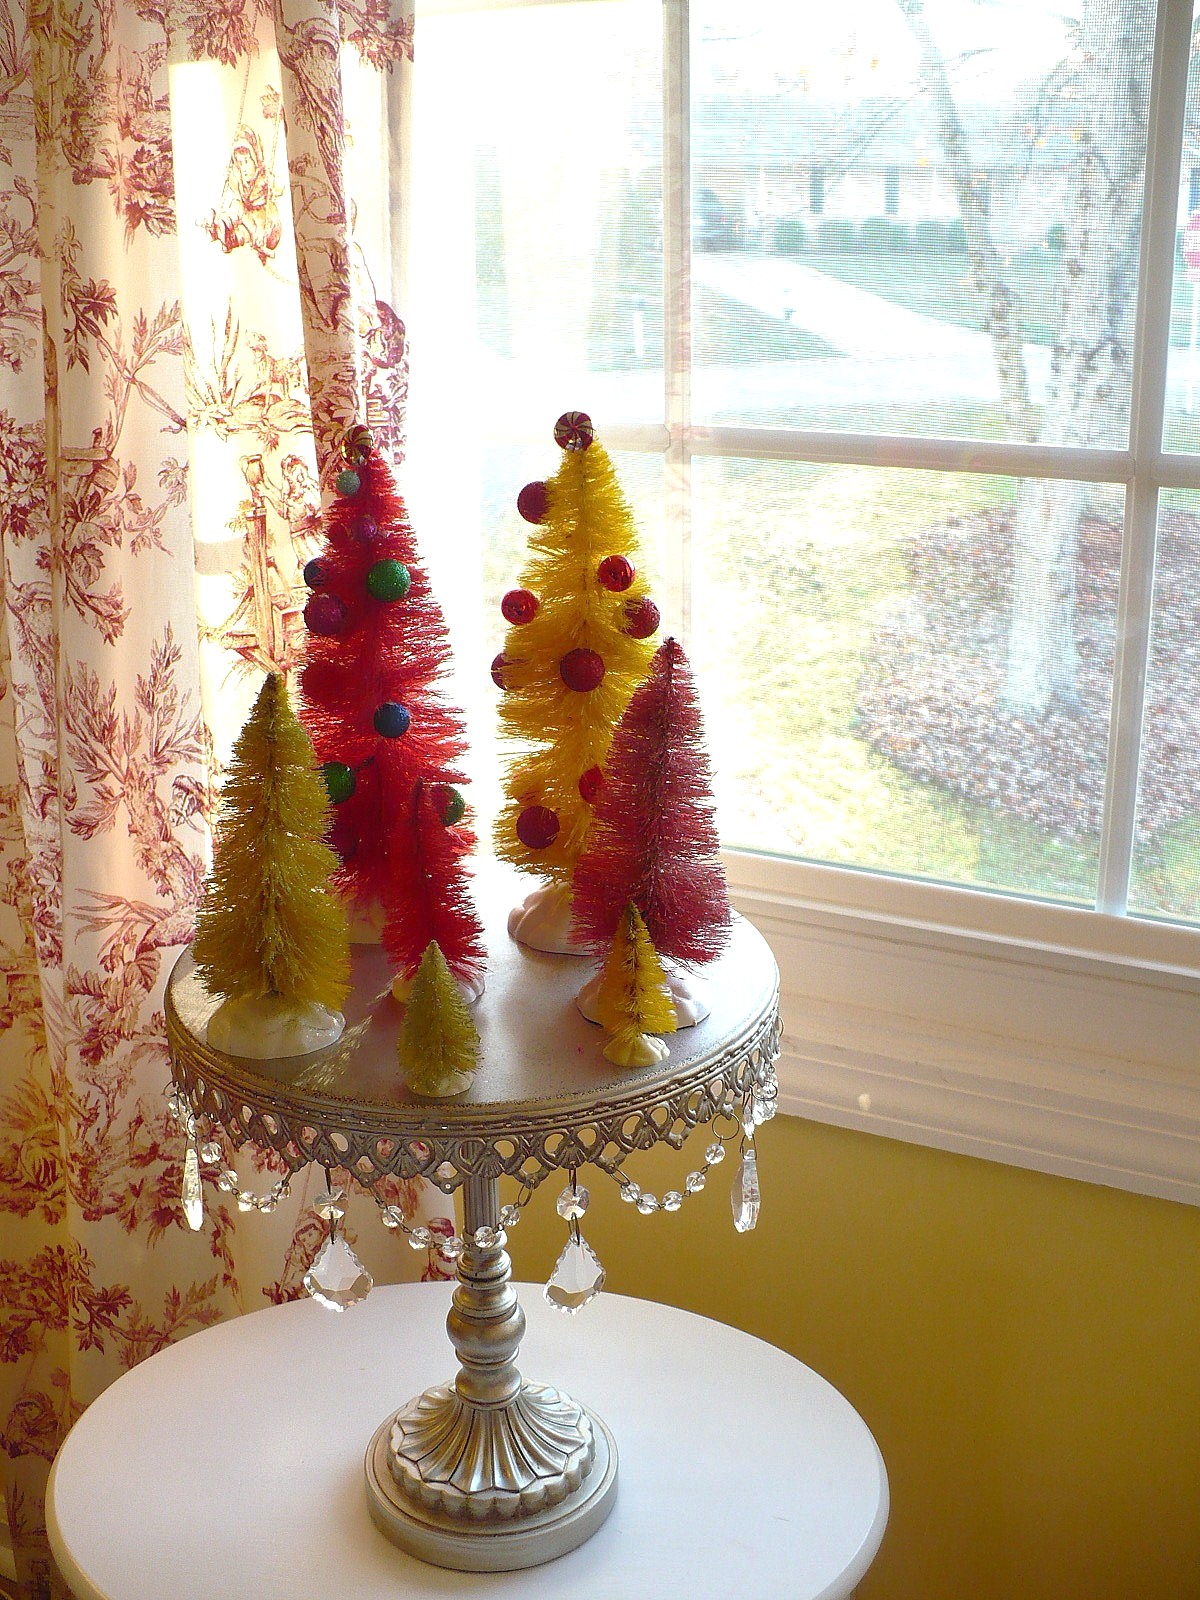
How cute are they! Yellow and red bottle brush trees at the fraction of what it would cost to buy them retail! Plus you’re free to choose whatever color works for your decor. You could do pink, or baby blue, black, multi colored…whatever!!
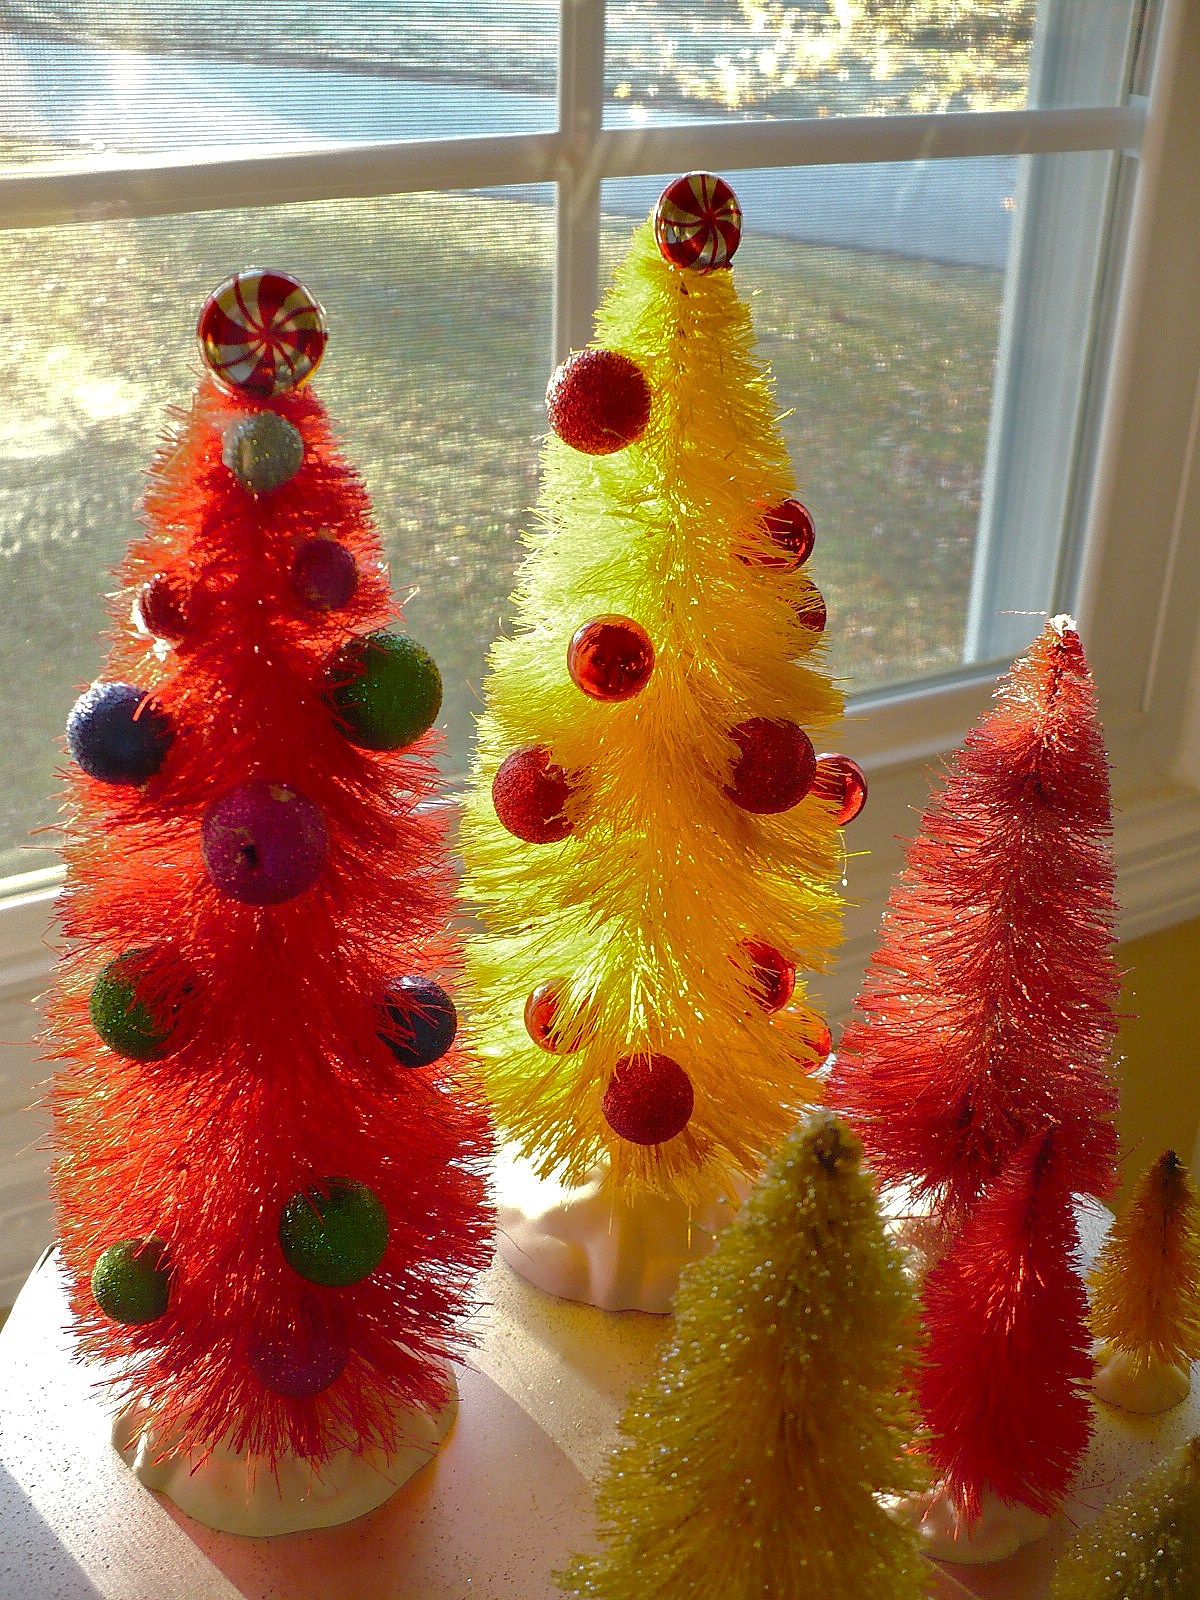
Then after you’re done dyeing them you can leave them as they are or you can cute them up by adding all kinds of embellishments!
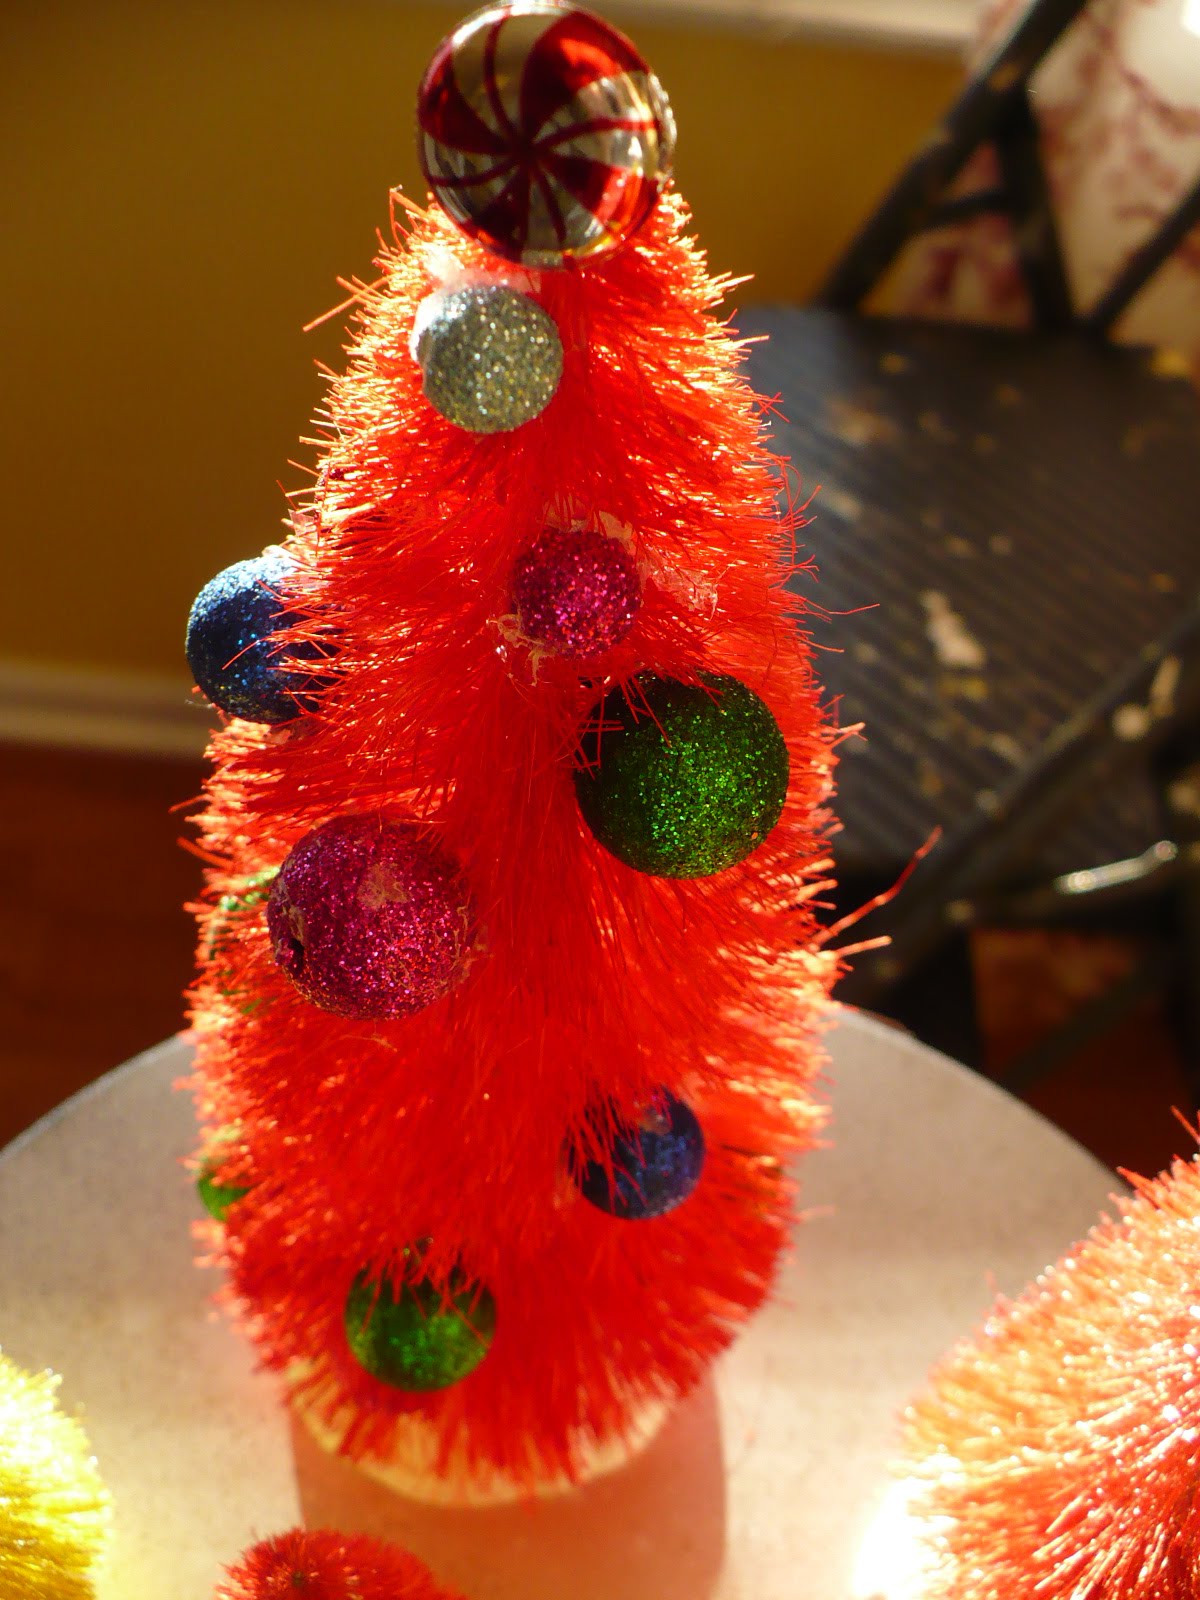
Some I sprayed with spray adhesive and then used some Martha Stewart glitter others I added some “ornaments”.
I have a few more to do and Wednesday I’ll show you where I put mine! Let me know if you try this. I’d love to see what you do with them!
Make your own bleached and dyed bottle brush trees. They’re inexpensive and easy to do!
Oh man! Why didn't I think of that? I sold a great big bag of bottle brush trees at my garage sale because they were green and my decorating has become more of the silver and white theme. Never ever would have thought to bleach them! You are the cleverest Manuela!
Jane
So, so cute and clever, Manuela!
Suzanne
Very cute project. I did some glitter fall projects and now I am looking forward to some glitter Christmas crafts! Thanks for sharing the idea!
So beautiful! What a fantastic project!xx
How clever of you to do this. I've never used bottle brush trees. I remember them from my childhood. I'll have to think of project to use some of these. Thanks for the inspiration! ~ Sarah
adorable… thanks for the idea!
Awesome! What a great theme as well.
I never in a million years would have thought to do this! How cool!
Manuela! What a great idea!! I LOVE bottle brush trees!!! I don't know why but I do!!
I am going to have to do this!!
Lou Cinda 🙂
Those turned out so CUTE! Love that idea!
How funny we have a similar theme this year. I can not wait to see what you are up to xoxo Clarice
Wow – what a great project. They turned out so pretty.
How cute is that!?!
How wonderful they turned out! What a great idea.
Oh, thanks for sharing! I want to make some off white trees with some glass glitter. I'm off to Michael's this afternoon. Hope I buy the right kind! 🙂
What a great idea!!! I love how pretty they look colored!!!
Oh how super creative you are! Love your idea, and you colors. Your nest will be beautiful this Christmas. AND I love your pedestal at the end of the post.:-)
Thanks for sharing!
very cute!
I learn something everytime I come to your blog.
Love the concept, but I haven't seen the trees in bags. Where did you get yours? We have an AC Moore and a Michaels near us.
Thanks!
Leann
Oh…you are a wonder!!! I love how these turned out…the white and the colors are adorable!!! I love the trees sitting on the pretty green tray…so pretty!!!
Enjoy!!!
XOXO
Cathy
Your trees are the cutest Christmas idea I have seen in forever. I love it! Thank you for sharing. Hugs!
Ohhhhh I LOVE this idea!
WHAT A SWEET IDEA!!! I always loved these when I was a child..thanks for sharing such a cute idea..I just loved it! Come say hi 😀
Very cute! I like how you can make them any color you want with this method. How do you keep the base from not turning the color of the dye? Is it because they are plastic and don't absorb the dye or does the base pop off? Can't wait to see where you put them. They seem to be just the right size for tucking into shelves and tablescapes.
The things you do are always beautiful. I like you're colors very cheery and the cake stand is gorgous. Linda
These are adorable! Thank you for sharing. I am looking forward to seeing photos of your house all decked-out for Christmas!
Blessings!
~Nadine
How neat! I have never used bottle-brush trees in my Christmas decorating before, but I really like them. Such a great idea!
Happy Monday to you!
xo
what a neat idea. very cute!
I looooovvvvve this idea!!
your so inspirational, thanks for the lovely blog, it's great, I
just love everything about it!!
Can't wait to read your next post!!
Love the idea! so cute!!
I got me a bag from Big Lots that I'm going to try this with. I hope they aren't plastic. Even if they don't bleach, I still like them green. It's just I prefer white/off white right now.
I would love for you to post this to my new mon. party Its So Very Creative
Cheri
What a wonderful idea! And they are so cheerfully colorful!
Cute, cute, cute! I got a bag of these last year clearanced out after Christmas, gosh I hope they arent plastic! I may try this, I have heard you can dye them with Koolaid too!
Those are awesome! I love the colors you are using. I cannot wait to see what you do with them.
Manuela, this is absolutely darling! I just love to look at your yellow and red bottle trees on your pretty tray!
Brenda
Love this idea! I'm gonna give it a try. They'd look so pretty under a cloche, no? Thanks for the idea.
peace.
They are so pretty, great idea!!!
How cute are these? What a good idea!
I mentioned you in my post today, Manuela. Stop by if you get a chance–I'm having a fun giveaway to celebrate my 100th post! You're such an inspiration to me!
You take such great photos for explaining exactly how you're doing everything. It helps so much. These turned out so cute. I love the way they look in your house too.
Blessings,
Marcia
Oh how cute and how easy is that! Thanks for sharing this. laurie
Oh, how cute! I didn't know you could bleach & redye them. 🙂
I think I got a cavity just looking at these!
Hi Manuela. At first I thought you meant the "real" bottle brush branches. I was going to run outside and look at my bottle brush tree and then I realized your were talking about store bought. How very clever indeed. Great idea.
This looks very fun! I'm going to look for a bag!
These are just too cute!! I am inspired to make some!! Thanks!
Very cute!
Those are too cute Manuela! Thanks for the idea 🙂
Have a wonderful evening!
Sharon
I'm so glad you posted this. I tried to bleach some last year, left it in the bleach OVERNIGHT and they were still green in the morning! I gave up. Glad to know it was the wrong tree and not me. Love the colors you used. Mimi
Love the little trees!
Hi Manuela,
I love this idea, and can't wait to try it! I love how yours turned out, and think they look so cute! 🙂 I think I will have to try making both bleached without added color and colorful ones too! 🙂
Thank you for sharing how you made yours! 🙂
What a cute idea…they look terrific!
What a CUTE idea! I love the colors and added touches to them. Great tutorial.
They are so cute! I would have never of come up with that!
You never cease to amazing me with your creativity! I love this post! What a great idea!
Swing by my blog when you get a chance I have an award for you! 🙂
Very fun! I didn't know that you could buy them in large bags — I'm going to have to start looking more closely!
Thank you for this post….I'm going to try this.
Excited,
Lady Queenie
Oh wow! That is so neat!! I love this project. Yours look the best!
what a great idea! I love the creativity in our world!
And to think I looked all over last year to get white ones for a table display! I will certainly try this idea, esp w/glitter.
Thanks for the tip. Nerm
I had just purchased that same pack when I saw your post. I bleached some of my trees, now I am running out to the store to purchase Rit dye. Love the idea, thanks for sharing with us.
Kate
This is such an awesome project! Can't wait to see all your beautiful Christmas decor!
So pretty!
So pretty!
So glad you showed us how to do this!!! WOW! The possibilities!!! Love the colors! Love your blog! Coming back soon!
Mama Holli
These are so adorable! I just wanted to say thanks for your sweet comment. I really needed that 🙂
Those are so cute! I actually like the white ones too. I have several of these, but I will probably just leave mine green. Love to use them all over. Yours are adorable in your house!
I love your little trees. They are adorable. Come by…I have an award for you.
Hugs,
Lee Laurie
So elegantly beautiful! And the photography is wonderful! Great idea!
Ach!! Absolutely brilliant.
Manuela, you are always thinking and doing. Thank you for generously sharing your multitude of creative ideas!!!
Love,
Tracey xoxo
P.S. I saw a packet of these little trees (green) at Big Lots last week~~I think they were about three dollars for a pack of six. xo
Hi Manuella! I am a new visitor to your blog and wanted your permission to create a post about you on my blog. Let me know what you think! I love your creations!
Mama Holli
Really?!! That is such a COOL idea! love it and I really like how you put the trees in the cups, etc.
These are so Awesome and that is why–You've been featured today so go check it out and grab your I've been featured button and proudly display it-you deserve it.
The tree post–feature–is a tree one as well–love them both.
Cheri
I loved this so much! I posted it to my blog to show everyone I know! =]
http://edenmarie44.blogspot.com/2009/12/my-obsession-with-christmas.html
"I LOVE these"… I Especially LOVE them just bleached out white!!! I'm going to be BLEACHING little trees next few weeks!!! Could it be done in the washing machine???
Hugs, Donna